I often talk to bloggers who are so convinced that they don’t have enough content or expertise to create valuable online courses, or that their audience would never buy such an online course, given that there is so much free material already on their websites.
If you’re one of these skeptical bloggers, I’ve got good news—not only have you been leaving money on the table by not offering your audience an online course, but much of the work required to do so is likely already done. Allow me to explain.
Bloggers are often the most equipped people to create an online course, and although it may not be in one place just yet, a good portion of their content is usually just waiting to be re-purposed into course form.
Why go through the trouble at all? If you’re a blogger or entrepreneur in the online space, you’ve probably heard the buzz about online courses. But if you’re still not sure why you would create one, let me assure you, they’re kind of a big deal.
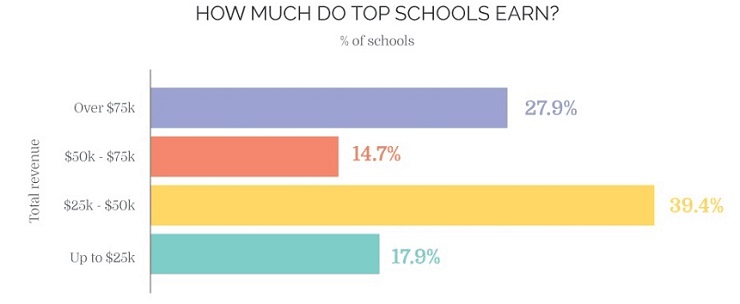
Consider that almost 40% of our top instructors at the company where I work, Teachable, are making between $25,000 and $50,000 a year selling online courses—especially if most of your legwork is already done, that could make a significant impact on your life.
Top schools are those whose sales make up 80% of all of the revenue generated by Teachable schools since the company started in late 2013. Source: Teachable
While creating an entire online course from scratch might seem like a huge time commitment, really, if you started a blog and it’s already successful, you already have a serious leg up on the competition.
Choosing a Topic for a Money-Making Online Course
Chances are, you already have a broad idea of what you’d want to teach an online course about. After all, if you’ve been creating content for a while now, you’ve likely established yourself as an authority in your particular niche. You really just need to narrow down a topic.
Respect your authority
One way to come up with a good strategy is to look at the content you’ve already created. Which blog posts have landed the most page views? Which posts got the most shares or the most people signing up for your email list? Those are the topics you can probably consider yourself an authority on and will be a good starting point while you’re digging for an online course topic.
The Expert Myth
Note that I used the word authority, not expert. Another misconception I see a lot is that you need to be an absolute expert on a topic to create an online course on it. In reality, we find that people who haven’t reached expert status create the best online courses.
Think about it, some experts have been masters of their crafts for longer than I’ve been alive—how well can they really remember the pain points they had when they were first starting back in the 80s? In addition, an “expert” may gloss over the things that they once struggled with, but are now as second-nature to them as breathing.
In fact, being just one step (or a few steps) ahead of your students is the best place you can be. You want to remember going through what your students are experiencing right now, and the steps you personally took to overcome those same struggles.
But back on track: Once you’ve come up with a list of blog posts that have performed well, group them together. Chances are, if you’ve niched down, there will be a lot of overlap. Perhaps you’re a music blogger and seven of your 10 most popular blog posts are covering fingerpicking for acoustic guitars. That might be a good place to start when you’re coming up with your course idea.
What not to do when choosing an online course topic
Word of warning, when you’re deciding on a course, do not try to be everything for everyone. Repeat: You can’t be everything for everyone.
You don’t want your very first course out of the gate to be, “The Grand Ultimate Guide to Everything You Will Ever Need to Know About Gardening.”
It’s easy to want to make the biggest and best course out there on any given topic, but we’ve found that focusing down and solving a highly specific problem, rather than trying to solve every problem with your online course, is better for both you and your students.
Pro Tip: The goal of your course is to provide a transformation. You want to take your students from point A to point B and solve a problem for them.
Instead of creating the ultimate guide to gardening that I mentioned earlier, you can create an online course taking your students step–by–step through growing a salsa garden. Teaching your audience how to grow a salsa garden will solve a specific problem for them (they want salsa), without overwhelming them.
Make a decision
Now decide on a topic. Remember, this is flexible, and you might find it shifting and transforming as you create your course, but get a good idea of what transformation you want to offer.
Pro Tip: Does your idea pass the toss and turn test? What is keeping your audience up at night? It’s likely not the niche you’re passionate about itself, but something specific within it. You want to solve their problem without having them sit through 30 minutes of unwanted content.
Need an extra boost of inspiration before settling on your online course topic? Mariah Coz has a great post walking you through her best advice.
Validate your idea
Once you’ve got a solid idea of what you might want to teach, you’ll want to validate your topic and make sure it’s something that your audience is actually interested in. Here is a walkthrough on how to validate an idea.
How to Turn Your Blog Posts Into an Online Course
Online courses are typically made up of a combination of videos, documents to read, quizzes, and workbooks. The videos can be a combination of slides containing course information and voice-over, or a video of yourself talking through the points.
Assembling your online course content
Once you’ve got a solid idea of what you want your online course topic to be, start by searching your blog archives and open all of the blog posts you’ve written on that topic.
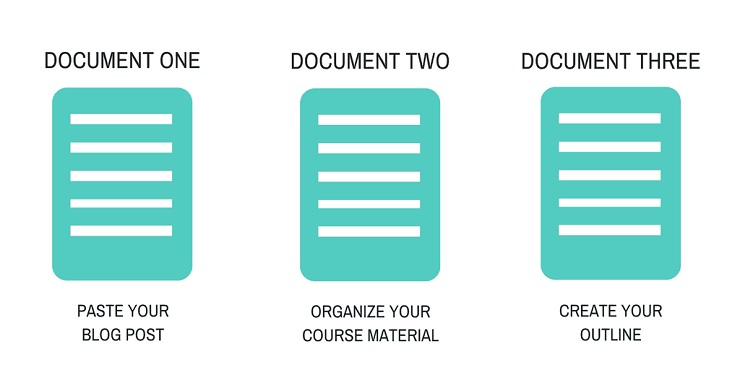
Now create three Google documents:
- In the first doc, copy and paste your blog posts so everything is in one, easy-to-access place.
- Use the second doc as your staging area, and copy and paste content that seems directly relevant to your topic.
- In the third document, start creating your actual course outline.
As you’re organizing in document two, sort through and get rid of any irrelevant information so the only content remaining fits your online course topic. Also, chances are, there will be a lot of repetitive information, so copy and paste only new information into your staging doc (document two).
Structuring your online course
To create the actual curriculum for your online course, open your outline doc (document three) and write down every step you took to become an authority in what you’re teaching. Think of the transformation you’re providing, and write down everything someone would have to do (even if it seems insignificant) to get to where you are.
You want to be super detailed here, or else you may discover gaps down the line when your first students are already going through the content.
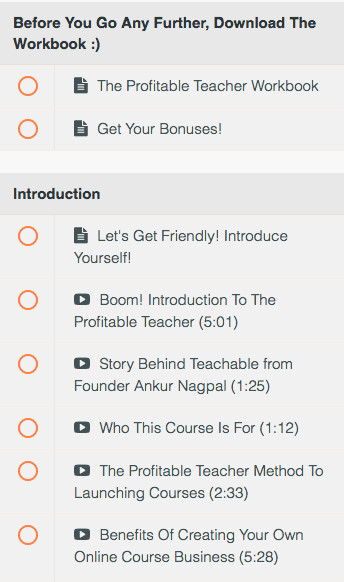
Once you’ve written all of your steps down, group similar steps into sections in your outline doc (document three). If you decide to create your online course using Teachable, your course structure will look like the image below with lectures within sections.
Once you’ve come up with your sections, you can further group your steps into videos. You’ll find that some steps deserve their own video (or maybe even two) while you can cover two or three steps in other videos.
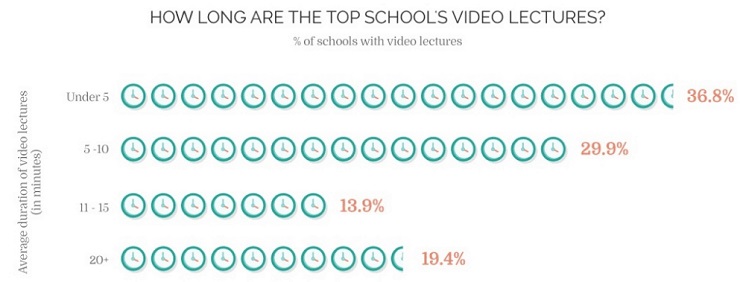
Now, your videos don’t need to be feature-length films. In fact, we recommend you keep them concise and to the point. Keeping each video under 10 minutes is ideal; anything longer than that and your audience may begin losing focus. Remember, this is the internet. There are shiny objects everywhere.
Adding content to your online course
Once you’ve got the outline and structure of your online course, you can begin creating the actual scripts in document three by filling in your outline with material you’ve already published on your blog.
Up until now, you’ve had to do a bit of work to get the ball rolling. But this is where your doc full of blog posts (doc 1) will come in to save the day, and hours of your time. You’ve likely already created a good chunk of your scripts, you just need to extract it from blog posts that you’ve written in the past.
Copy and paste material from your blog post document into the appropriate sections in document 3, noting what you have and haven’t used on the master doc by crossing out or deleting material as you transfer it over.
Filling in the blanks
Once you’ve copied your blog posts over, there may still be a few steps or details that you didn’t cover on your blog—now would be the time to fill in the blanks.
Look over the script you made and fill in the holes where you see them. Once you’ve finished doing so, you should have a complete working script. Go back through, edit, and refine it.
Creating your slides
Now that you’ve got your course divided into sections and fleshed out with content, creating your slides is as easy as plugging all the material in. There are even plenty of premade templates out there that you can use if you’re creatively gunshy.
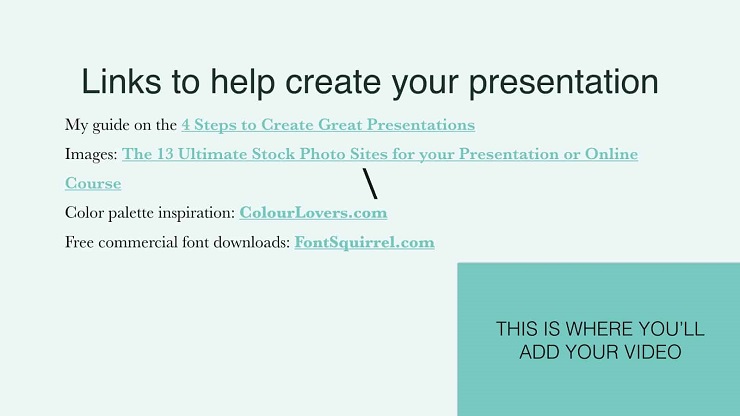
An example of a beautiful slide like the ones you may want to create for your online course.
Now, you don’t have to go the premade route, but if you decide to, you can download free templates from our own designer here. Otherwise, you can play around on SlideShare, PowerPoint, Google Presentations, or whichever program you decide to use, and create your own custom template that matches your brand perfectly.
Before you start designing your slides, decide whether or not you want a video element in the presentations. Some people use just slides and a voiceover, while others will choose to create floating head videos that look like this:
If you opt for a floating head video, keep in mind that during the design process, you’re going to want to block off the bottom corner of all of your slides so your video doesn’t cover any text when you edit it in.
As far as organization goes, each section you grouped together in your master doc should become its own video lecture, and each step in the section should have its own slide (or two or three).
When you’re recording your content, you don’t want to sound like you’re reading word for word, so I recommend adding talking points to your slides rather than complete sentences. You know your material and you’re confident in what you’re teaching, so being able to extrapolate on those points without reading from a script shouldn’t be too difficult.
Great Video Makes a Great Online Course
Once your slides are complete, you can turn them into course videos by either adding a video of yourself or a voice-over. There’s nothing wrong with sticking to voice-over, but either way you go, it’s important to let your personality shine through and make a high-quality recording.
If you’re going the voice-over route, consider using a screen recording program like Screenflow or Camtasia, so you can click through your slides and get the timing perfect when you edit the sound in. This can save you hours of time that you’d otherwise spend trying to get the timing of your slides to perfectly match your voiceover.
You can either use your doc as a script, or simply use the slides as talking points. The latter tends to sound more natural, but if you’re nervous on camera or prone to rambling, it might be a good idea to practice exactly what you’re going to say with your script doc once or twice before hitting record.
Setting up a home studio on any budget
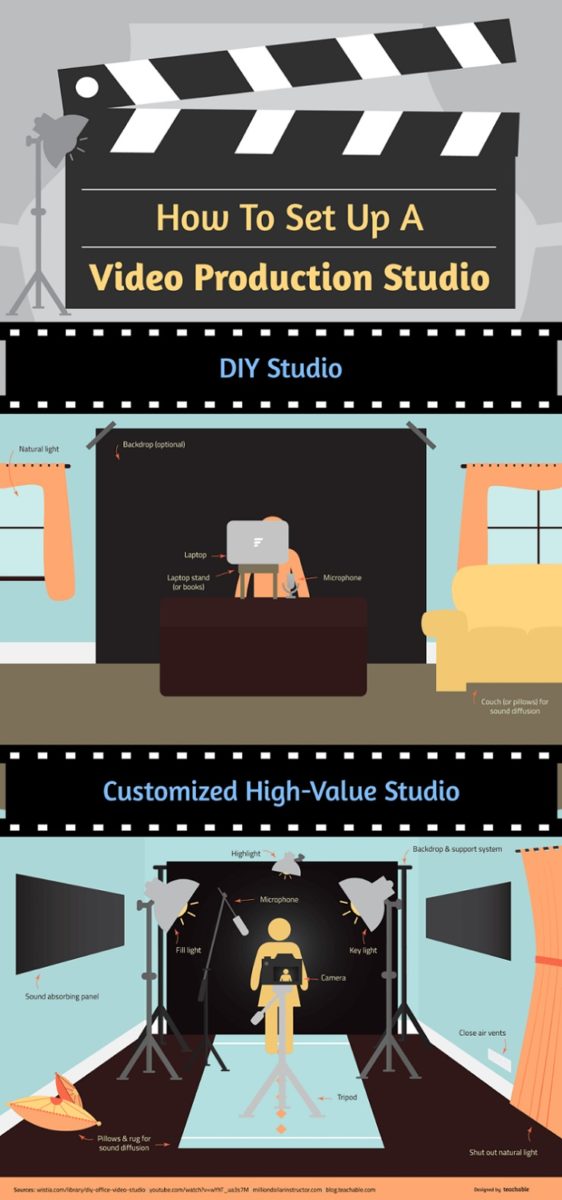
During my time at Teachable, I’ve seen some truly beautiful DIY home studios, and some less beautiful studios. Now, you really don’t need to invest anything into creating your videos unless you choose to, but here are some tips to follow at different price points.
The backdrop
The background of your video is more important than you might realize—it can either add to your credibility and professionalism or distract from your content.
Be conscious of what your background looks like if you’re not using a plain wall or backdrop. Having your real-life workspace or desk in the video can look really cool, just make sure that you’ve tidied up before you start rolling. Otherwise, you’re always safe using a plain-colored backdrop.
Pro tip: You don’t need to invest in professional-quality backdrops. Instead, pick out an on-brand wrapping paper. It’s a three-dollar solution that adds a huge element of professionalism to your videos. If you choose a patterned paper, though, make sure it’s a large pattern or else it might get a little wonky on camera.
The sound
If nothing else, I recommend spending a little extra time and money on increasing the quality of your sound. In terms of video quality, the audio is actually more important than the picture. You can buy a cheap lapel mic on Amazon for less than $20. If you want to go a step above that, our favorite microphone is the Yeti Mic. It runs a little over $100 on Amazon, but the sound is incredible.
You can still always hack your way to better sound for free. If you record video on your laptop, you can record the audio on your phone, and set it closer to your mouth so it will sound richer. (We’ve even had people hang their phones from the ceiling to dangle it just above the video frame.)
Pro tip: If you’re filming in a large room, or one with a lot of hard surfaces, you’ll need to think about echo. Cover any hard surface like the floors, dressers, counters, or tables, with blankets, pillows, sweaters, or any other soft fabric you can get your hands on. This will help muffle any echo and increase the sound quality.
The camera
When it comes to cameras, just about anything will work. You don’t need to shell out for the latest and greatest 4k camera. Your webcam or smartphone should suffice.
If you’re using your webcam, make sure that your camera screen is at a ninety-degree angle (so you’re not getting a strange up–the–nose shot) and that it’s at eye–level. The same applies to using your cellphone, with the added tip that you should be filming with your phone horizontal rather than vertical.
Pro tip: It might sound insignificant, but always wipe your lens down before you start filming. Smudges or fingerprints can result in a fuzzy looking picture.
The lighting
Your final consideration should be lighting. Poor lighting can produce strange shadows, make it look like you’re filming in a dungeon, or cast a strange hue. My recommendation is to sit by a big window to use that free, natural light.
If you only have time to film during the evening, or you don’t have access to a window, then consider investing in a ring light.
Pro tip: You can buy two $3 white foam boards to position on either side of you to bounce light back towards you. This is especially effective if you’re working with limited natural light.
Really, though, there are a million different things you can do to DIY your home studio, and I could spend hours going through them all. If you’re interested in learning more about DIY-ing your home studio, check out this blog post.
Editing video
Video editing seems like a complicated feat, but with the right program, it’s as easy as hitting “cut” and “delete” a few times.
If you want to create the “floating head” videos (the ones that look like this):
We recommend you use iMovie, Screenflow, or Camtasia. These programs will allow you to import your slides and make them full screen, while allowing you to simultaneously display your video in the corner of your slides.
Screenflow and Camtasia are both paid programs, but iMovie is free. If you’re on a PC rather than a Mac, Windows Movie Maker is the default editing program. Unfortunately, if there is a way to create floating head videos on Movie Maker, I haven’t figured it out yet. Camtasia is also PC friendly and is a one-time purchase of $199.
Pro tip: When it comes to actually uploading your videos, we recommend you compress your files in Handbrake for a quicker upload. Depending on your camera, the settings you exported your file with, and your wifi speed, this can be the difference between a 30-second upload and a 30-minute upload.
Bonuses!
Once you’ve got your videos uploaded and course organized, you can decide if you want to offer any bonuses. These can be in the form of extra videos, worksheets, access to online communities, and more.
Chances are, you didn’t use every last piece of information from that master doc of blog posts. If you want to create bonus worksheets to accompany your course, I would recommend starting there. You can piece together a sheet of “pro-tips,” shortcuts, or related material that your students will benefit from.
Another option is to create an online community for your students. This is a great way to foster community and allow your students to work together, but keep in mind it’s a longer term commitment for you to manage.
We recommend using either Facebook or Slack for your online communities, as they both promote conversation and collaboration.
Is Anybody Going to Buy This Thing?
Woohoo! You’ve finally created your first online course, and you’re ready to teach online! Now, it just comes down to finding interested students who are eager to buy.
There are a million of different ways you can go about that. Your best option, though? Selling to your own email list. These are your number one fans, who have signed up to specifically hear from you.
If you haven’t started growing your email list, no worries. There are a million different resources on how to grow your list, but this guide detailing the 14 steps Foundr took to grow their email list to 250k+ is a great place to start.
At Teachable, we recommend launching with what we call our Crazy 8 Launch Strategy, but there are dozens of other approaches you can take. You’re a blogger, so you can consider launching your online course with your blog, but I still recommend doing so in conjunction with launching to your email list.
Of course, you’re likely a master of content at this point, but if you’re looking for input from the experts on how to start content marketing for maximum results, look no further.
Congratulations, You’re an Online Teacher!
You’ll notice a running theme throughout this post, that there’s a lot of customization to be done when it comes to creating an online course. That’s part of the beauty of them: you can find a course with pretty much any style or subject under the sun, and the only limit in making one is your own knowledge and creativity.
Anything else making you toss and turn? Any course creation questions? Let me know and I’ll be hanging out in the comments to answer them!

