If you’re like 97% of ecommerce entrepreneurs, you may be forced to shut down your store because you’re not converting traffic into sales. Maybe you’re running ecommerce Facebook Ads that aren’t returning on the investment. And you’re struggling to hit your first milestone of $1,000 per month.
One study found that 62% of small business owners said their Facebook Ads were “missing the target.”
It’s not that these businesses don’t see any returns, rather, it’s the “quality of the returns and the lack of conversions” that are the problem.
And yet, marketers continue to pour billions of advertising dollars into ecommerce Facebook ads, and for good reason—if you get it right, they work. It’s a great place to start your marketing efforts.
In this article, we’ll be breaking down the ecommerce Facebook ads strategy that first-time entrepreneur Manuela Lasry used to hit $1,000 per month with her Shopify apparel store, Classy RRadical. We’ll also be providing you with tactical advice that you can implement in your own Shopify Facebook ad campaigns, right away.
The basic premise behind this strategy is to use one round of Facebook ads to drive traffic to your website in order to collect data from those website visitors. Then, you group the data into custom audiences and send a second round of Facebook ads (this is called retargeting) to convert visitors into sales. We’ll go through each of these steps below, in full detail.
Table of Contents
Phase 1: Data Collection Using Facebook Pixel & Testing Single-Interest Ads
Phase 2: Creating Custom Audiences Using Pixel Data
Phase 3: Creating Lookalike Audiences (LLAs)
Phase 4: Retargeting Campaign
Celebrate Your Results
Phase 1: Data Collection Using Facebook Pixel & Testing Single-Interest Ads
One of the main things that makes Facebook such a powerful marketing platform is its sophisticated targeting capabilities.
In order to fully exploit this feature, you need to run tests to identify a winning audience by collecting data on the people who visit your website. The Facebook Pixel (explained below) will track actions and events, such as content views and adding to carts, which will allow you to target specific segments of people who took specific actions on your website at a later stage.
This will allow your campaigns to be driven by data, rather than making guesses as to what’s working and what isn’t. The performance of the ads will speak for themselves, allowing you to kill the losing ads and scale the winning ads.
Step 1: Setting up the Facebook Pixel
The first thing you need to do to collect data on your website visitors is install a Facebook Pixel. This is a simple piece of code you plug into your website that allows you to track activity coming from your ads. If you’re unsure how to do this, check out this guide, as we won’t get into technical details. Don’t worry, it’s extremely easy to do!
Once your Pixel is active, you’re all set to start running ads that will generate your website traffic.
Understanding Facebook Campaign Structure
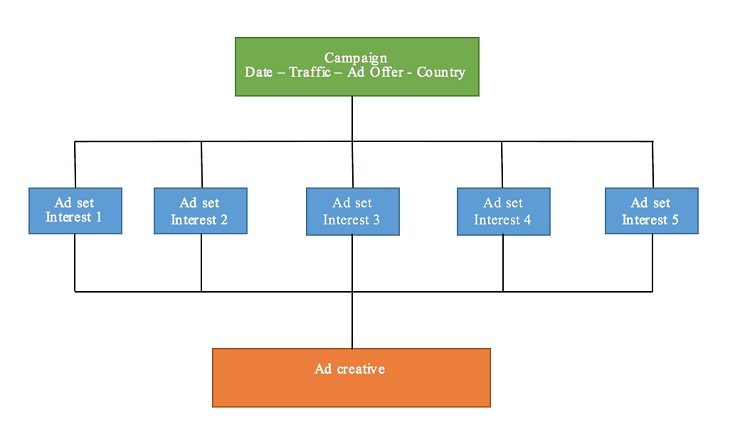
Before diving deep into the tactical aspects of setting up your first ad funnels, it’s extremely important that you understand Facebook’s campaign structure.
As you can see in the diagram, it’s pretty straightforward, but if you need more information, use this resource. We’ll get into the details next.
Step 2: Setting up a Traffic-Optimized Campaign
For each of your advertising objectives, you need to set up a campaign. Our objective for this first campaign is to drive traffic to our site to collect audience data from visitor behavior on our site.
We need people to find and use our site to be able to collect data on them. Later, we will use this data to run retargeting ads that will be more personalized, which increases conversions.
So your first campaign objective is “traffic.”
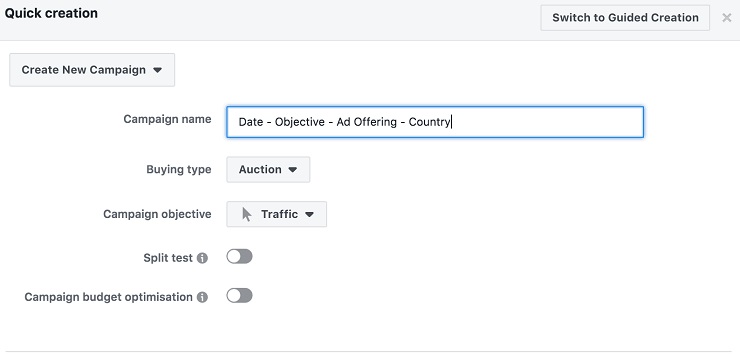
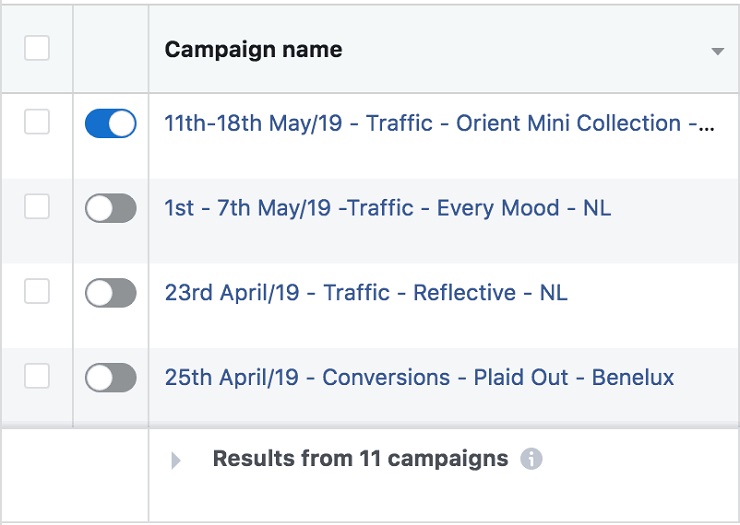
A good way to keep track of your campaigns and save time is to name them well. Create yourself a format that you can use to easily keep track of them. Like this:
Date – Objective – Ad Offering – Country
Now that your campaign is set up and your objective is clear, you can start creating the ad set, which defines who we are targeting (demographics, interests, etc.).
Step 3: Testing Audiences with Interest-Based Targeting
The most important thing to focus on at this point is targeting. You’re going to use the interest-based detailed targeting feature and create audience segments in order to find a winning target audience.
To target interests, I recommend you consult your customer personas. At this point in your entrepreneurial journey, you should have your ideal customer personas mapped out. If you don’t, it’s a good idea to create them. Check out this guide on how to do it.
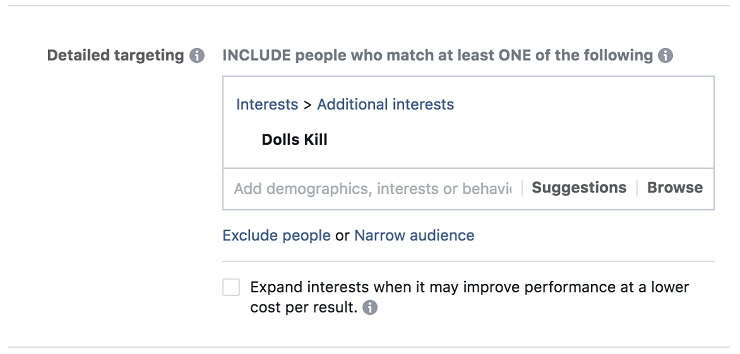
When you’re selecting interests to define your audience, you want to get specific. A good starting point is targeting customers of competing brands. Manuela sells edgy women’s wear and a competitor in her niche is Dolls Kill.
The suggestions tool is a powerful feature that you can use to see similar competitors you can use to help you target.
Other interests to target are celebrities and influencers that your customers are fans of, or blogs, magazines, and other media they are likely to consume.
One of the biggest and most common mistakes people make when creating Facebook ads is adding as many interests as they can possibly think of and hoping for the best.
The problem is that this gives you no control. You won’t know which of the different targeted interests is performing best and which is costing you money. You have no way of identifying the winners to scale and losers to kill. You might think testing is wasting money, but it’s actually what will allow you to save money.
So target only one interest per ad set so you know exactly which ads perform and which ones are losers.
Step 4: Split Testing Single-Interest Ad Sets
To find a winning audience, start with $5/day targeting 5-10 single interest-based ad sets, depending on your budget. If $50/day isn’t in your budget, start with 5 ad sets to pay $25/day.
Step 5: Placements, Optimization, and Delivery
For your ad placements, you have two options. Facebook’s recommended option is “automatic placements,” in which Facebook will allocate your ad set’s budget across Facebook’s platforms.
If you only want your ads to appear on Instagram, click on “Edit placements” and only select Instagram.
Manuela only runs her ads on Instagram because her ads have performed poorly on Facebook in the past. If you’ve never run Facebook ads, try “automatic placements” to see where your ads perform best.
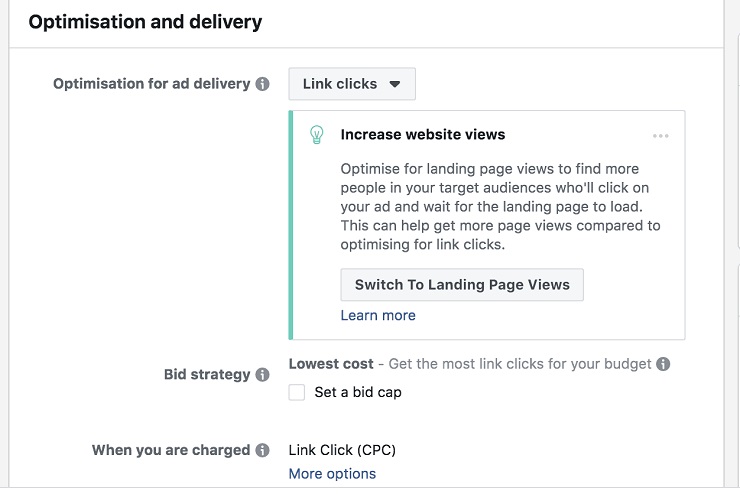
Optimization and Delivery
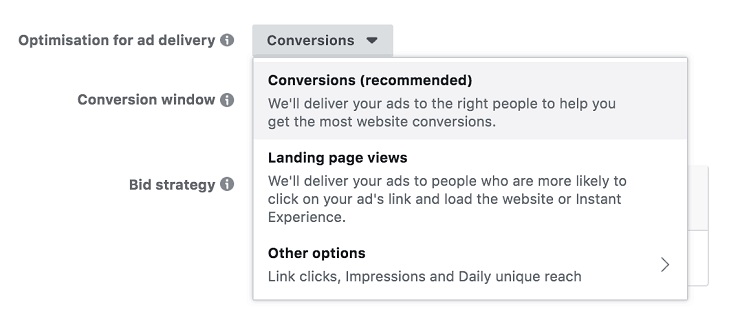
The most important thing in this section is “when you are charged.” The default option that Facebook suggests is paying for “impressions.” Impressions are simply the number of times people view your post or ad. It’s often considered a “vanity metric,” as it doesn’t actually benefit your business goals.
Click on “more options” and select “Link Click (CPC).” By selecting this option, you’ll only be charged when a potential customer clicks on your ad.
There are two major benefits to using CPC. First, you’ll only pay when people actually visit your website after clicking on your ad. Second, you’ll be able to gain a more accurate picture of your campaign’s performance, as you’ll be able to analyze a key performance metric known as cost per click (the actual cost of each link click).
Facebook rewards you with a lower CPC when your ads are performing well. This is one way to know which ones to keep (high performers) and which to turn off (low performers). We’ll talk a little more about this later.
Step 6: The Ad Creative
If your store sells multiple products and you have a collection or specific selection of products that you want to promote, start with a carousel ad. These ads are engaging and drive up to 10 times more traffic than static sponsored posts on Facebook.
The Facebook carousel ad allows you to place up to 10 images or “cards,” with headlines, links, and calls to action in a single ad.
You can get as creative as you want with the images you select, but they should clearly depict the products you’re selling. Remember that the key here is just to get traffic to your website so you can start collecting data. You aren’t necessarily promoting one particular product. We just want to get people to your website, so choose your most popular products or those that come with discounts or other incentives to get people to visit.
Creating Your Interest-Based Ads
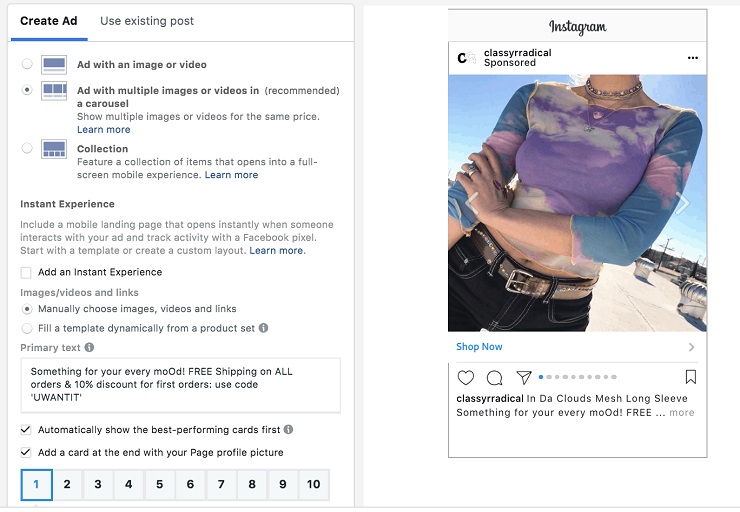
Manuela has a store with many products, so she opted for a carousel ad to promote a specific selection of clothing items. The pieces don’t necessarily have a similar aesthetic, but the selection is curated to be suitable for a variety of moods and occasions.
The “primary text” (as shown above), or your ad copy, will appear below the carousel ad. Because there isn’t much space for text, you want the copy to be short and straightforward. Your main value proposition should be made as clear as possible with the fewest number of words possible. When writing your ad copy, think of the one thing you want to communicate. What is the main message you want to get across?
Persuading people to take action can be achieved through communicating the main benefit of your product, offering a strong incentive and a call to action.
In the example above, you can see that Manuela’s value proposition is products that are suitable for “every mood.” She couples this with free shipping and a 10% discount as an incentive. The only thing missing is a call to action like “shop now,” although this is already included in the ad.
Note: You can also save the discount for a later stage in the campaign when you will retarget people who took an action on this first ad. Typically, a discount is exactly what people need to go back and revisit your site and continue their shopping or purchase.
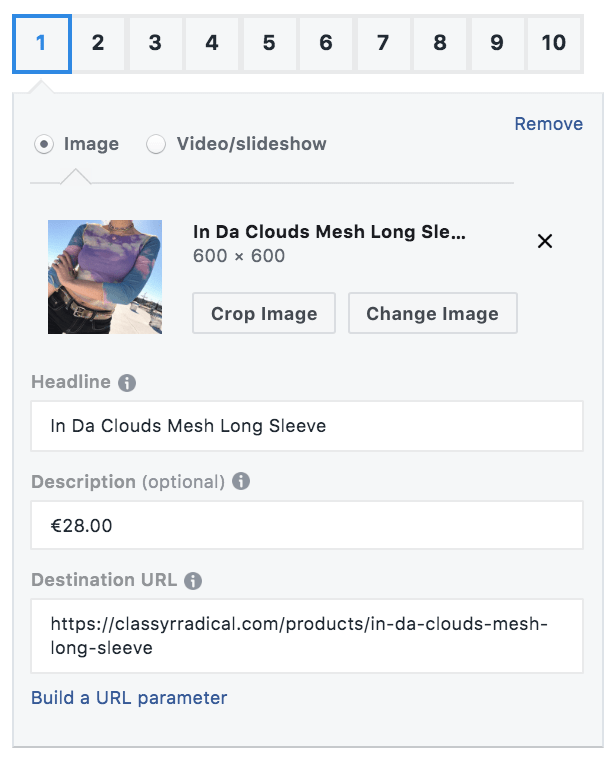
Once you have all your images imported, you need to insert a headline, description, and destination URL.
The headline can simply be the product’s name, as Manuela has done. The description doesn’t need to be the product’s price, but if the product you’re selling has an attractive price, then it may be a good idea to include it, as that’s part of your value proposition. Check out this article to get inspired and learn what makes a great headline.
When you insert the “Destination URL,” double-check to see that they’re working. This is super important, as viewers need to be able to click on the image and be redirected to your landing page.
Because you are testing your audience targeting, at this stage you want to keep the ad creative the same for all the ad sets. The only thing different will be the interest targeting for each ad.
Need more help with ad creative? There are two free tools that you can use as a starting point to get the inspirational juices flowing for your ad creative.
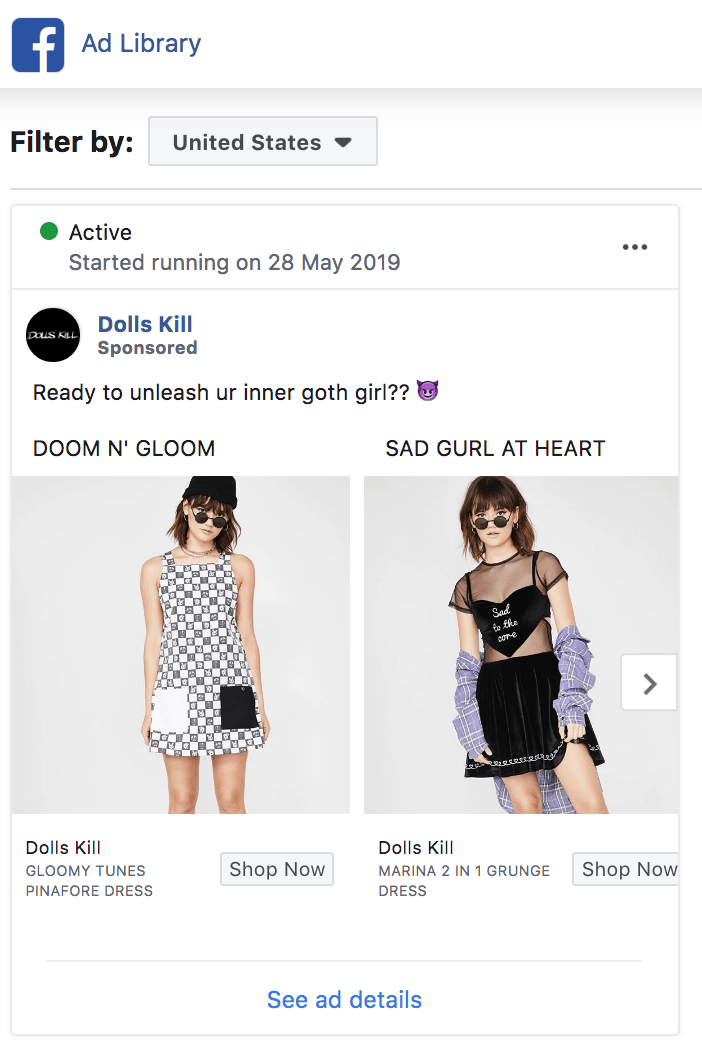
The first is Facebook’s tool called Ad Library. Type in the name of your competitor or any other business you’d like to take a look at, select the country, and you’ll be able to see all the active ads they are currently running in that country.
Facebook also has design recommendations that you should use in order to maximize your performance. This is especially important in regard to technical specifications like file size, file type, and image resolution.
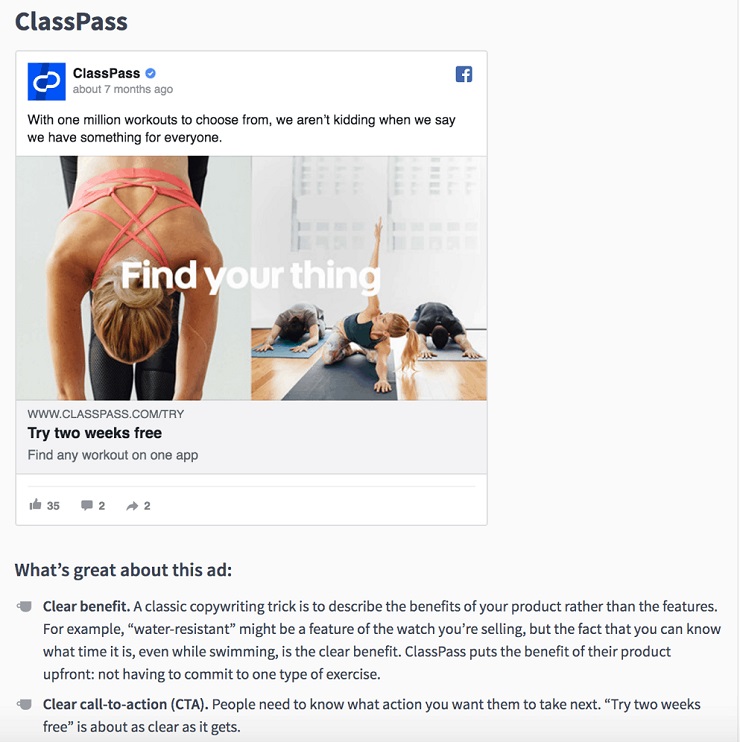
The second is Adespresso’s tool, which is a curation of examples from every industry.
Each ad example has a section below with an explanation of what makes the ad great. Not only will you learn what makes an ad effective, you’ll find tons of examples that will definitely inspire you.
Phase 1 Complete!
In this section, we discussed how to set up your first ad campaign to drive people to your website and collect data on their behavior. Remember, we are targeting one interest per ad set in this phase. Here is a visualization:
You’re all ready to publish your ads! Make sure you monitor them so that you can kill the losers and winners after approximately 48 hours. Run the winners for at least a week. Continue testing interests similar to the winning ones to collect more purchase data.
At this stage, CPC is enough to see which of your ads are performing best. At later stages, CPC needs to be used in conjunction with other metrics to give you a more comprehensive picture of performance. Obviously, CPC will vary a lot depending on the industry and country you’re targeting, but this you can see the averages per country here.
Note that you may get some sales during this stage, but that’s just icing on the cake at this point. Right now you’re just driving visitors, and the real sales will come later with retargeting.
Phase 2: Creating Custom Audiences Using Pixel Data
Now that you’ve collected data on the actions people have taken on your website with your Facebook Pixel (check out all the actions that the Pixel collects data on, known as “events,” here), you can start creating custom audiences.
According to Facebook, “a custom audience is a type of audience that you can create that is made up of your existing customers.” But thanks to the Facebook Pixel, the custom audience you create can be made up of not just customers, but your entire audience.
This covers all website visitors, visitors who have viewed specific pages, or taken some form of action like adding an item to cart. You’ll be creating a custom audience for each of these events in order to run campaigns retargeting specific segments of that audience.
For example, you can use retargeting ads for people who have visited your cart page but did not checkout, running ads catering specifically to them.
Step 1: Create Custom Audiences for all Events Tracked by the Pixel
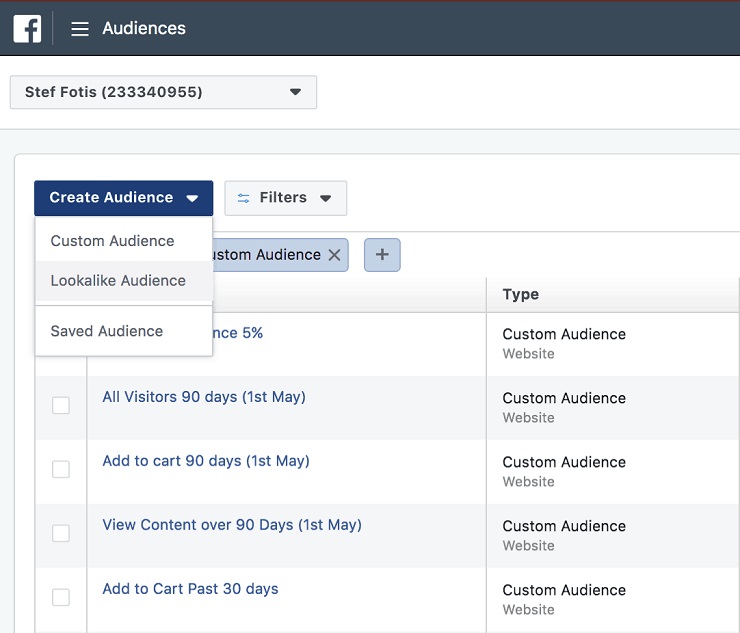
In order to create a custom audience, navigate to the menu in Ads Manager and open the drop-down menu. Click on Audiences and you’ll see this page:
Select audiences, navigate to the create audience drop-down, and click on custom audience.
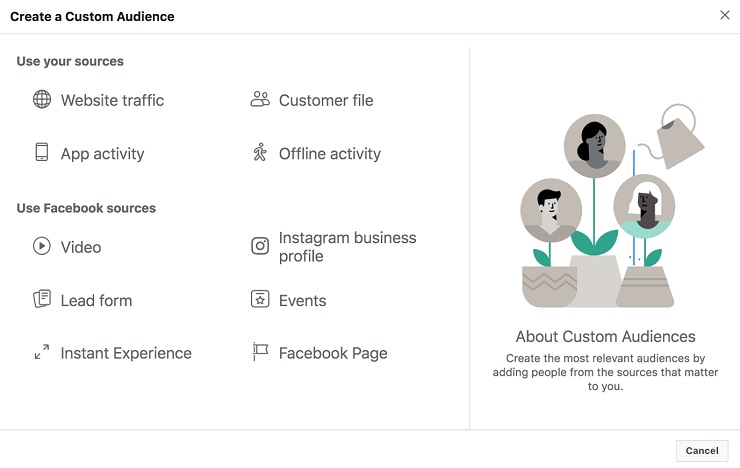
Facebook has various options that you can select to create your custom audiences. Because we’re using data tracked by the Facebook Pixel, you want to use “website traffic” as your source.
Custom Audiences from Website Traffic and Events Tracked by Pixel
Once you’ve clicked on website traffic, you’ll be led to this page:
You can get really specific with your targeting here. First, select whether you want to target all or any potential customers who suit the criteria you’re going to select in the next section.
You can target all website visitors, people who visited specific web pages, visitors by time spent, or visitors who took specific actions like page views, content views, search, and add to cart. Create a custom audience for each of these events your Facebook Pixel has tracked in order to have them ready for later use.
The timeframe can range from 30 days to 180 days, and you’ll want to set the duration to when you set up your Pixel and started the initial campaign using interest-based ads.
There’s no limit to the size of these audiences, but knowing how many people constitute these audiences before you create each one is helpful.
In order to see the size of your audiences, navigate to the menu in Ads Manager, open drop-down menu. Click on Pixels and you’ll see this page:
In the overview, you can see the audience sizes for page views, content views, and add to carts. You can also go ahead and create a custom audience directly from here, as shown in the top right corner.
Now you’re all set to create ads using these custom audiences. Although Facebook doesn’t have a minimum, you might decide that they are still too small. Note that in the next phase, you’re going to use your custom audiences to create Lookalike Audiences (LLAs). The minimum size needed for an LLA is 100, although you’ll be able to create higher quality LLAs with larger audiences.
Phase 3: Creating Lookalike Audiences (LLAs)
Step 1: Create Lookalike Audiences Based on Custom Audiences
An LLA allows you to target new users that share the same characteristics as your audiences. Create your LLA by navigating to the same section where you created custom audiences in the Ads Manager.
Lookalike Specifics
To create your LLA, you need a source, which will be the custom audiences you created in the previous phase. First, click on other sources and select a custom audience you created. You’re going to create lookalike audiences for all of them, so it doesn’t matter which one you start with.
Note: Facebook takes a while to populate the lookalike audiences, so batch this activity to have them all ready at once.
The second step is to select the location of your LLA. The source audience needs to have a minimum of 100 unique people from the same country in order for Facebook to create you a custom audience.
Note: You can only create 1 lookalike audience per country.
This is the part that trips up most people creating lookalike audiences for the first time.
The percentage scale ranging from 0-10% defines the size and similarity of your LLA to your custom audience. The closer to 10%, the larger the audience and the less similar it will be. In other words, the wider your net.
At this stage, you should be in the range of 1-5%, depending on the country you are targeting. The larger the population of the country, the lower the percentage.
Manuela is targeting people in the Netherlands, which has a fairly small population (17 million), so 5% is a good starting point. If you’re targeting a country with a larger population like the United States, start with 1-3% (relatively smaller but more similar).
Step 2: Test Lookalike Audiences
Once your LLAs have been populated, you’re all set to start running campaigns and testing your freshly created audiences. Create a campaign with traffic set as your objective. This campaign will be identical to the first campaign you set up.
The only difference is that you’ll be changing the audiences in the ad sets with all your LLAs including website visitors, content views, and add to carts. Keep the budget the same at $5/day. According to Facebook, you should run these ads for at least a week before killing them. However, if you see that they are performing really poorly, kill them sooner.
Why are we creating ads with LLAs? Why not go right into retargeting after the first set of ads to get website traffic? The reason is two-fold:
1. You need to test the various LLAs (website visitors, content views, add to carts) before you start retargeting them to collect the right data.
2. Targeting new users using LLAs will give us a larger pool of potential customers and more data to later retarget everyone.
Performance Analysis
The key metric you want to be looking at here is still CPC. Although at this stage you should start bringing in some sales and at the very least breaking even on your Return on Ad Spend (ROAS).
Note: Lookalike Audiences go stale over time. When you start to see performance declining, refresh your LLAs by deleting them and creating new ones, every three months or so.
Phase 4: Retargeting Campaign
At this point, you’ll have approximately a month of conversion data collected, and it’s time to start retargeting everyone who took a specific action on your ad or website.
Step 1: Start a Campaign to Retarget Potential Customers Who Took an Action
You’re going to set up a campaign to retarget everyone who took an action on your website, excluding those who have already made purchases. These actions have all been tracked as events with your Facebook Pixel, so you have a lot of valuable data stored.
In order to retarget everyone, you’ll be using the custom audiences you’ve already created. The custom audiences will update automatically, as the Facebook Pixel continues to fire every time someone takes an action on your website.
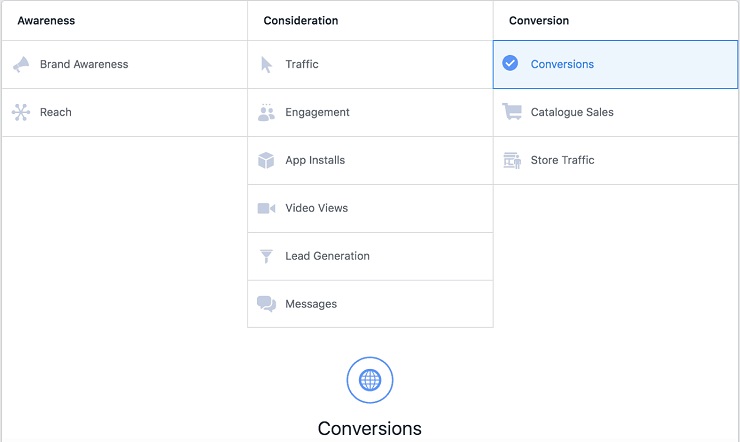
Navigate to your ads manager and create a new campaign. This time, you want to click on conversions as your objective, since you are going for the sale.
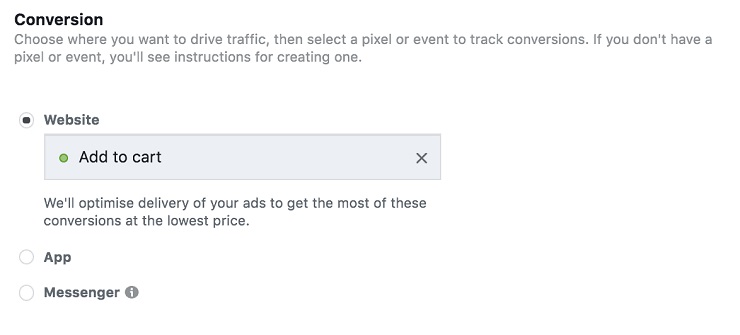
Now, just because you’ve selected conversions as your campaign objective, it doesn’t mean your ads are optimized for the conversions you want. You have to choose the type of conversion:
The most logical type of conversion is a purchase. However, according to Facebook you need to have at least 15-25 conversions per week for the specific conversion you’ve selected, and more than 100 for optimal performance.
If you haven’t had many purchases on your store yet, optimize for a conversion further up in the customer funnel. Here’s an example of what your sales funnel should look like.
If you’re getting fewer than 15-25 conversions at the purchase end of the funnel, select a conversion higher up like “add to cart.” If you have 100-200 conversions for add to cart, which you probably do at this stage, select add to cart.
Step 2: Select Your Audience
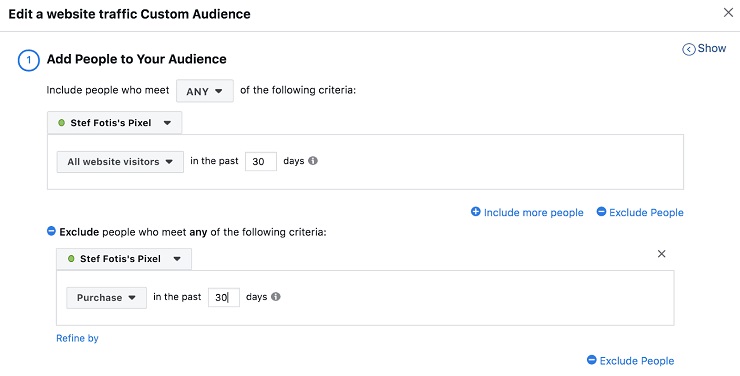
At this stage, you’ve already created the custom audiences you’ll be using. However, you want to edit the audiences to exclude people who have already made purchases.
Navigate to your audiences and click on the custom audience you want to edit and select to exclude people who purchased.
Step 3: Set up Optimization and Delivery
The optimization and delivery for your conversion campaign will be different than it was for the traffic campaign. Changing the optimization to conversions (as Facebook recommends) may result in fewer link clicks, but more conversions, which is what you want.
Step 4: Set Your Conversion Window
The conversion window is an important feature to understand. Think about the duration of time it takes for a potential customer to take your desired action. How likely is it that someone who first sees your ad will instantly make a purchase?
Consider that they might be on their commute when they first see the ad. Despite the fact that they’re interested, they won’t be able to make the purchase. But three days later they might be in the ideal situation to do so.
This scenario usually makes sense in ecommerce. If you feel like it does, click on 7 days after clicking and 1 day after viewing.
Step 5: Set Your Budget
In regards to the budget, for conversion campaigns you want to allocate double the budget that allotted for the traffic campaigns. This is due to the fact that a conversion will cost you more.
Step 6: Adjust Your Ad Creative
The most important thing here is to change the ad copy. Include an incentive like a large discount, in order to finally close the sale. (This is why including a discount in your initial ad isn’t always a great idea.)
Keep the ad images the same as your first round, since you’re targeting people who have taken interest in your selection of products, but haven’t made purchases yet. So essentially, you are using the same product images, but offering an incentive to revisit your site and make a purchase.
Final Step: Scale Your Campaign
In order to scale your retargeting campaigns:
- First, optimize for conversions higher up in the funnel that you have more data for (e.g., add to cart).
- Move further and further down your funnel as you get more data (closer to checkout and purchase).
- Keep an eye on Return on Ad Spend (ROAS).
- Increase your budget as you move down through your funnel, assuming you’re seeing a return on your ad spend.
Celebrate Your Shopify Facebook Ad Results
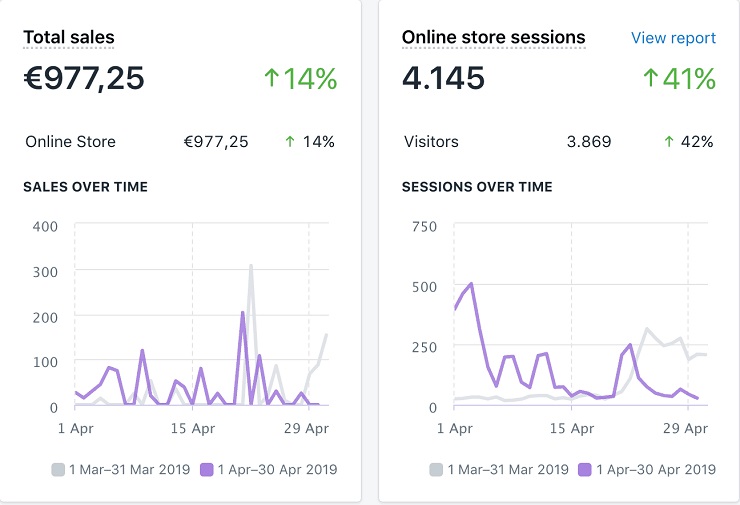
After a month of running the initial data collection traffic campaign, the lookalike campaign and the retargeting campaign, Manuela generated €977,25, which is $1,088 in US dollars.
The total ad spend for Manuela’s campaign was $310.
With very little overhead, this strategy can allow you to scale slowly and steadily as you further optimize with more data.
Hopefully this case study will help you reach your own revenue milestone! Specific questions? Lessons learned? Campaign results? Feel free to reach out or share in the comments below!
