The words “technical SEO” often send a chill down the average entrepreneur’s spine. That’s likely because someone in their company, at some point, did something really, really wrong. Technical SEO consultants are usually the ones called in when a site loses 90% of its traffic overnight.
But technical SEO is also a growing focus that many companies have been doubling down on, as they realize the value add when it comes to bringing in organic traffic and potential leads.
What Is Technical SEO?
Technical SEO is one of the most important pillars of search engine optimization, often neglected, but one that has grown to hold a ton of importance in recent years. Technical SEO refers to improvement of the technical aspects of your website (think: behind the curtain) in order to increase its rankings in search results.
Your goal with technical SEO is basically to make your website faster, easier to use, and easier for Google to crawl and index. The tasks can range all the way from optimizing your server stack to adding an internal link to a recently published post. If all this stuff freaks you out a little, don’t worry I will walk you through it.
Disclaimer: This article will be a little technical and I don’t recommend you try and implement all these ideas at one time. I recommend you bookmark this article and come back to it when you can or when you need it. You could also use it as a guide to give to a technical team member or consultant to implement on your website.
EXCLUSIVE FREE TRAINING: Successful Founders Teach You How to Start and Grow an Online Business
Table of Contents
1. Create and Submit an XML Sitemap to Search Console
2. Configure Your Robots.txt File
3. Check Your Meta Robots Tags
4. Make Your Website Faster
5. Make Your Website Mobile Friendly
6. Fix Crawl Errors and Redirects
7. Fix Duplicate and Thin Content Issues
Technical SEO Doesn’t Have to Be Scary!
Make it Easier to Find Your Site
Google and other search engines mainly find websites and new pages on the internet though backlinks and sitemaps, using bots often called web crawlers or spiders.
That’s one of the biggest reasons to build high quality backlinks to your site.
More backlinks = more chances that Google’s bot will stumble upon a link to your website while it’s crawling the web. Here are the steps to make your website easier to find.
1. Create and Submit an XML Sitemap to Search Console
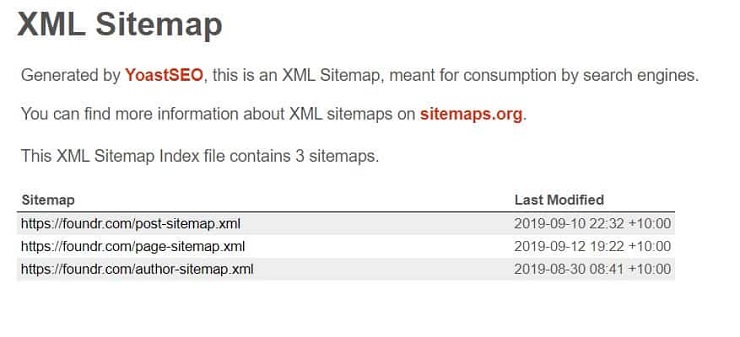
An XML sitemap is an XML file that lists a website’s important pages. It’s a page that’s rarely seen by humans, meant for search engines like Google.
The above picture is of Foundr.com’s sitemap that can be found here.
If you are using a CMS like WordPress you can easily create a sitemap like that using an SEO plugin like Yoast SEO or Rank Math. Other services like Shopify automatically generates a sitemap for you.
Google also recommends having an HTML sitemap for your readers, like this.
You can also generate a sitemap using online sitemap generation tools like XML-Sitemaps.com. However, using a plugin or script for your sitemap generation is better, as it automatically updates with new pages when you publish more content.
Once you’ve created your sitemap, add it to your robots.txt file (robots.txt is a text file that tells Google and other search engines what to crawl and what they shouldn’t, located at example.com/robots.txt ) and also submit it to Search Console and Bing Webmaster tools by following this guide.
Make it Easier to Crawl Your Site
Once a search engine spider has discovered your website, either through backlinks or a sitemap submitted, it’ll try to crawl your site. Crawling is basically the process of Google visiting your site, trying to understand what’s on it and then deciding how it should rank it.
Now here’s where the majority of technical SEO mistakes tend to happen.
2. Configure Your Robots.txt File
If your robots.txt file blocks the crawler, the GoogleBot spider will not come to your website or specific web page, at all.
You can find the robots.txt file of any domain by going to example.com/robots.txt.
The above picture is of Foundr’s robots.txt found here that allows crawling of all pages and blocks crawling of WordPress admin pages.
The example below would be a misconfigured robots.txt that would block all search engines from crawling your site.
User-agent: *
Disallow: /
This can usually occur after a staged site or a site under construction was made live and the developer forgot to remove the “Disallow: /”
You can test your Robots.txt in search console. I’d recommend using a couple of important pages on your website to test whether your robots.txt is blocking your pages from being crawled.
3. Check Your Meta Robots Tags
This one’s a bit more technical. If you have trouble understanding, a developer or SEO specialist should be able to assist. But I’ll try to keep it straightforward.
A meta robots tag is a tiny piece of code that allows you to decide which pages you want to show up on Google and which pages you don’t. It can also allow you to decide if you want the links on a particular pages to pass backlink “juice” (how much power a backlink passes to another page to strengthen it) & authority or not.
The meta robots tag will look something like this in your site’s code:
<meta name=”robots” content=”noindex,nofollow“/>
The “noindex” tag allows you to prevent a page from showing up on Google’s results, this can be extremely useful for low quality pages (pages like landing pages with little content, login pages, webinar invites, confirmation pages, etc.), or middle-of-funnel pages.
One of Google’s Updates called Panda negatively impacts sites that have too many “low quality” pages as a proportion of the overall number of pages.
Middle-of-the-funnel content like landing pages don’t have a lot of content on them and you really don’t need them to rank like you would an in-depth blog post for example. So it makes sense to noindex the pages you are not interested in ranking in Google. On the flip side, you also want to make sure that the pages you want to rank don’t have a “noindex” tag.
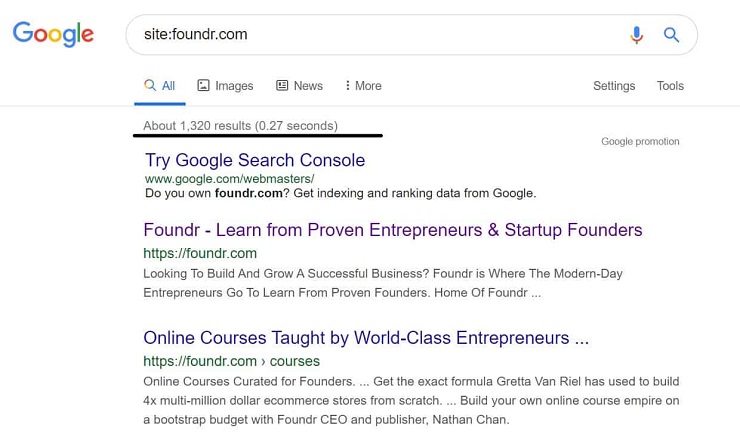
You can use the “site:” operator in Google, to see all the pages that are already indexed on your site.
Just Google site:yoursitename.com and you will get a list of all the pages on your site that Google has indexed with the total number at the top.
If you notice pages showing up that you don’t want to be in the search results, you might have your meta robots tag misconfigured. Check to make sure the pages you want to be in Google’s indexed pages are there and the pages you don’t want to be there are not. Add or remove the noindex tag where needed.
The other tag you see, “nofollow”, basically tells Google & other search engines that you don’t want the links on that page to be crawled. If you use the “nofollow” tag, no authority will be passed to the linked pages. Using a page level meta robots “nofollow” tag is usually not recommended and instead it’s better to nofollow individuals links.
Google recommends using nofollow for affiliate links, sponsored links, comment links, and other links to sites whose content you wouldn’t trust.
When you combine nofollow and noindex, that means every individual page on your website can have one of four configurations and works differently based on that. The key is to know which pages have which configuration (see below) and be able to customize your pages to get the most visibility from Google.
Here are the four configurations:
- noindex, nofollow: Page doesn’t show up on Google and all links in page aren’t crawled.
- noindex, follow: Same as above. Links won’t be crawled if the page is not indexed.
- index, nofollow: Page can show up on Google but links in page aren’t crawled.
- index, follow: Page can show up on Google and links in page can be crawled.
If your page has “noindex” in the source code (i.e., configuration 1 or 2), that page won’t show up on Google and Google won’t crawl the links on that page.
Here’s a great guide by Yoast on what pages you may want to noindex or nofollow.
But basically, you want all the pages you don’t want to show up on Google and other search engines (eg. middle of funnel pages, subscriber confirmation pages, thank you pages, login pages, gated content, etc.) to have “noindex, nofollow” in the meta robots tag.
If you have no meta robots tag on a page, then Google considers it to be “index, follow”. This should be the default for all the pages you want to rank on Google and all your pages that have backlinks.
In WordPress, you can change page level meta robots of individual pages as well as based on the type of the page, using an SEO plugin like Yoast, which is very convenient.
Note: Until recently you could also block pages from showing up in search results by using “noindex” in the robots.txt file, however Google has discontinued it. Hence it’s a best practice to use tags like above to block any content from showing up on Google’s results.
4. Make Your Website Faster
Having a slow website is bad for your website’s SEO on two fronts:
Google uses speed as a ranking factor.
Google announced way back in 2010 that it’ll start using website speed as a ranking factor, also Moz found a high correlation between TTFB (time-to-first-byte) and higher rankings.
People hate slow websites.
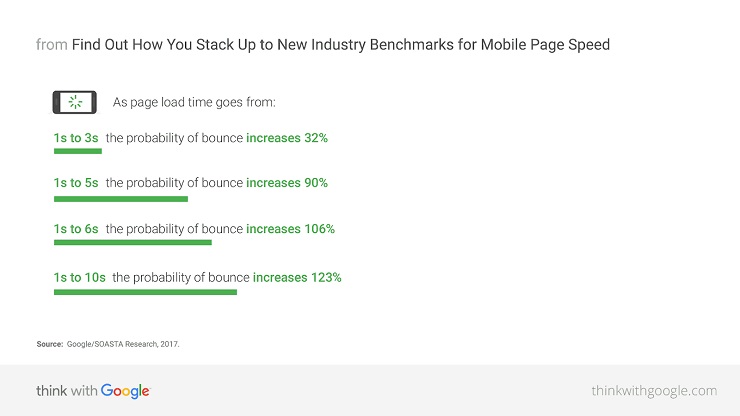
It’s a no brainer that people don’t want to spend time waiting for things to load. According to Google, if it takes more than three seconds for a page to load on mobile, over half of visitors will leave it.
Source: ThinkWithGoogle.com
Think about that—instead of building more backlinks or writing more content you can improve your conversions just by making your site faster.
That’s not the only reason. If people come to your website, bounce “back,” and click on a different search result, over time Google will devalue your site and give the other search engine results result higher rankings than yours.
When users hit the back button & bounce when they arrive to your webpage from Google, it’s called “pogo-sticking,” and it’s not something you want them to do. You should do everything you can to make sure your users have a good experience, and making your website faster is one of the easiest ways to do that.

How do you increase your website speed?
There are hundreds of issues that can affect the speed of your webpage. All the way from the server structure and location to the size of images. Here are the most common reasons that websites are slow:
- Uncompressed and unoptimized images
- Slow web hosting
- Too many requests & No HTTP/2
- Too much third party bloat (and plugins if you’re using WordPress)
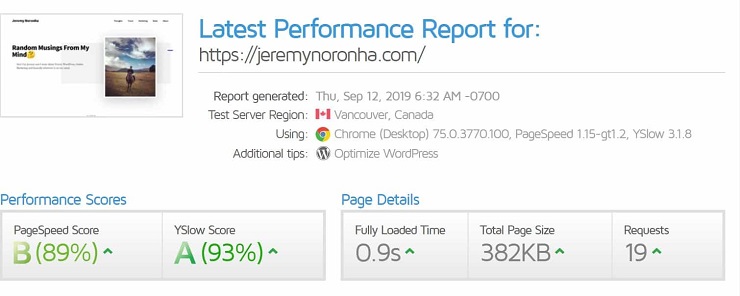
Google’s PageSpeed insights is a great tool to start diagnosing your website’s speed problems. GTMetrix, Pingdom, web.dev, and WebPageTest are a few others that give you more data.
Following the recommendations on tools like Google’s PageSpeed Insights can help you easily improve your website load time. However, don’t get caught up in trying to get 100/100 on your Pagespeed score, as 80+ is good enough.
You want your site to load faster, not just score high points on a vanity metric. That’s why other tools like GTmetrix and Pingdom are useful because they display your actual load time in seconds.
While my site JeremyNoronha.com scores a 89/100 on Google’s Pagespeed insights, it loads in less than 1 second. Similarly, for many businesses, after a certain point it’s not worth it to spend time and money on speed.
Going from a 10-second load time to 2 seconds will do wonders for your business. Going from 2 seconds to 1.5 seconds won’t really change much.
Be sure to do the tests on your blog posts and not just your homepage, as they tend to be the slowest, especially those with the heavy use of images and scripts.
Optimize your images.
Images are some of the heaviest parts of websites nowadays, especially as mobile use continues to grow and more people are browsing the internet on mobile data. Using an image compressor like TinyPNG and TinyJPG can save you a lot of bandwidth.
Here are some other tricks that help in image optimization:
- Resize images before you upload them, based on the size you plan to display them at.
- JPEG images are usually smaller in size than PNG, although PNG are usually better in quality. PNG is best suited for images with text, illustrations, logo, etc. For blog content, JPEG images are usually better.
- Use Vector Images (SVG) when possible, as they scale with no loss of quality.
- Combine images into CSS scripts (for small images like logos).
Here’s a good guide from GTMetrix on how to optimize images.
Change hosting if needed.
One of the major factors that influence the speed of a website is the hosting provider and setup. If you use WordPress and get a lot of visitors, a shared hosting setup will not cut it, and managed WordPress hosting like Kinsta or WPEngine are better.
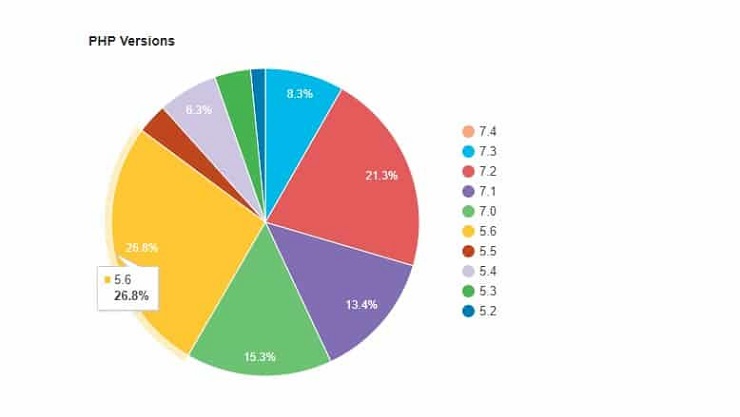
Does your host support the latest technology? According to WordPress.org statistics, 26.8% of WordPress sites are on PHP 5.6 (outdated version of a software that powers WordPress) as I write this.
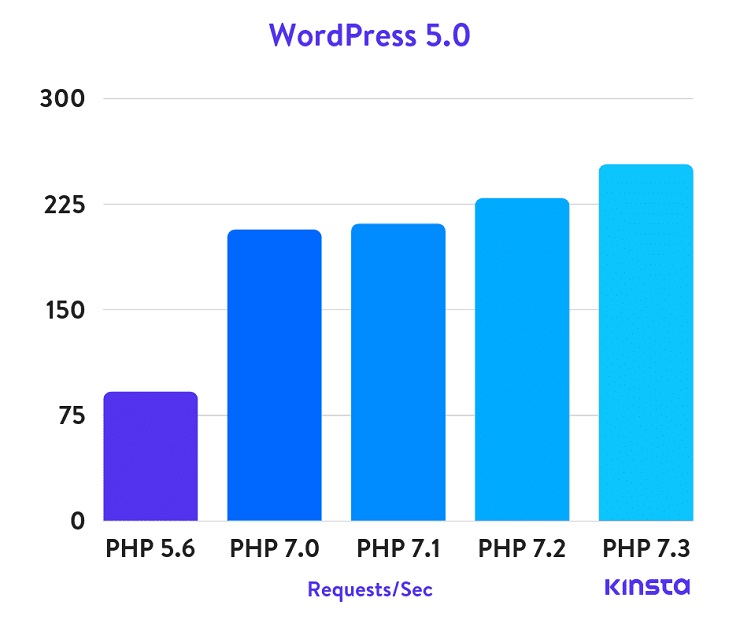
PHP 5.6 reached its end of life in December 2018. Not only are older PHP versions not supported anymore, but upgrading to the latest versions actually makes your site faster.
Kinsta did a PHP performance test, comparing PHP 5.6, PHP 7.0, PHP 7.1, PHP 7.2 and PHP 7.3. They found that PHP 7.3 executes three times as many requests per second compared to PHP 5.6.
Image Source: Kinsta
If you use WordPress, you can use a plugin like Display PHP version to check what version you’re running.
Other features to look for in a good host include cache, a content delivery network (CDN), and HTTP/2. Here’s a good resource on what these things mean to help you speed up a WordPress site.
EXCLUSIVE FREE TRAINING: Successful Founders Teach You How to Start and Grow an Online Business
Improve How Google Indexes Your Site
In simple terms, indexing is Google adding your website to its database and its search results. A web page has to be indexed before it can show up on Google’s search results. Here’s how you improve how Google indexes your site.
5. Make Your Website Mobile Friendly
Since mid-2018, Google has been slowly rolling out Mobile First Indexing, wherein they will use the mobile version of your page for indexing and ranking, not the desktop version.
Starting July 1, 2019, all new websites “previously unknown to Google Search” will be indexed using mobile-first indexing. That means that if you don’t have a mobile friendly website, your rankings on Google could drop dramatically. If Google can’t visit your website using a mobile browser, it won’t rank or index your website.
Having a website today that’s not mobile friendly is like having a business in the 2000s that doesn’t embrace the internet.
Go to Google’s Mobile Friendly Testing Tool and test your webpage to see whether you’re mobile friendly or not.
However, you shouldn’t settle for just being responsive and mobile friendly. That’s the status quo.
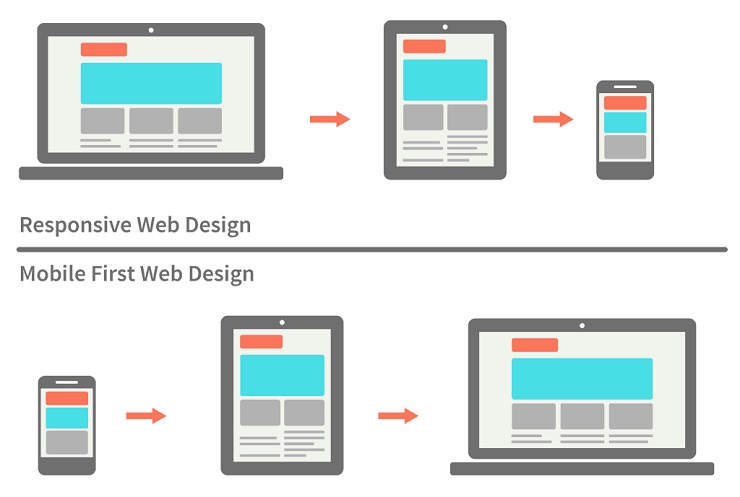
You want to have a mobile-first design approach in 2019. What is mobile first? It means that your website is not just responsive (works on different screen sizes) but it’s built with mobile and smaller devices first and then scaled for larger screens.
Ban mobile popups.
You also want to improve the user experience for your user on mobile, which means no popups the moment someone comes to your webpage. In fact, Google rolled out a penalty for mobile-intrusive interstitials in 2017 for pages that have too many pop ups or content that made view less accessible on mobile.
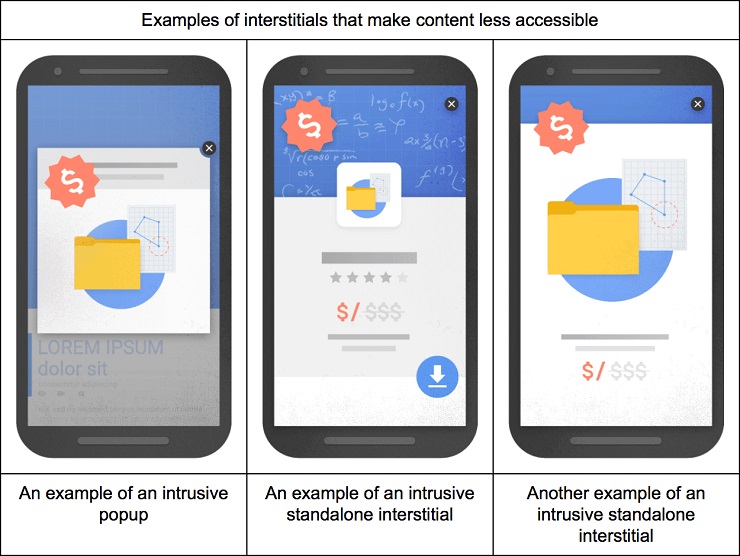
One alternative is to have a scroll-triggered pop up. This pop up shows up once a user scrolls a certain distance down your page. They are less intrusive and they only target people who are interested in reading your content.
Here’s an easy to follow Guide to a Mobile Friendly Website by QuickSprout to help you optimize your site for mobile.
6. Fix Crawl Errors and Redirects
Crawl errors occur when a search engine tries to reach a page on your website but isn’t successful. Crawl errors are most common among older and larger sites that have been around for a long time.
Every link on your website should ideally lead to an actual page, if you get crawl errors it means that Google found a page that doesn’t exist or a page that exists is returning an error to Google.
One of the most popular fixes for pages that don’t exist is redirecting pages. However, you should always aim to keep the redirect chains (a redirect chain occurs when there is more than one redirect between the initial URL and the destination URL) to a minimum.
Image Source: redirect-checker.org
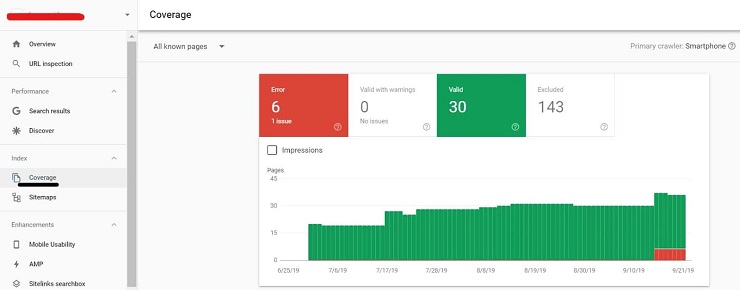
You can find the crawl errors for your site in Search Console, under “Coverage.”
There are mainly three forms of crawl errors you can find on Search Console:
- Soft 404s: Server error or incorrect redirection
- 4xx: Googlebot tries to crawl a page that doesn’t exist on your site
- Blocked by robots.txt/Access denied: Usually when GoogleBot is blocked from crawling a page
Here’s a guide from Moz on how to fix the above errors.
You can also find major on-site crawl hurdles by using a spider like ScreamingFrog or Sitebulb to audit your site, and by going through your server log files using a log analyzer.
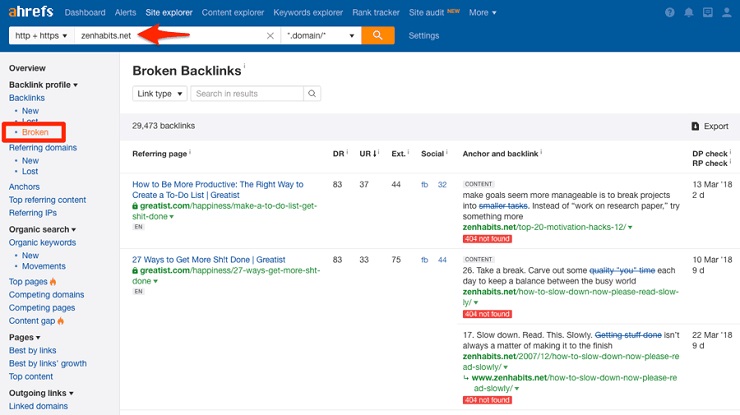
You can also use ScreamingFrog or Sitebulb to find and fix internal redirects and a tool like Ahrefs to find and fix external backlinks. Broken external links can lead to more crawl errors and also loss of rankings due to loss of link authority.
Source: Ahrefs
7. Fix Duplicate and Thin Content Issues
Thin content is basically content with little or no added value. Google considers doorway pages (web pages that are created for the deliberate manipulation of search engine indexes), low-quality affiliate links pages, scraped content, or even pages with very little or no content as thin content pages.
The amount of content, or number of words, isn’t always a good measure of this, as sometimes a 500-word article can get straight to the point and answer a search query. The best way to judge thin content or low quality pages is based on how your audience treats it. If a page has a really high bounce rate it may be considered thin content.
If you have a website with a ton of low quality pages, it might be a good idea to perform a content audit to clear up a lot of your thin content. Otherwise, you can also noindex your thin content pages, if you use them for other purposes (email marketing, sales funnels) but don’t want them to hurt your SEO.
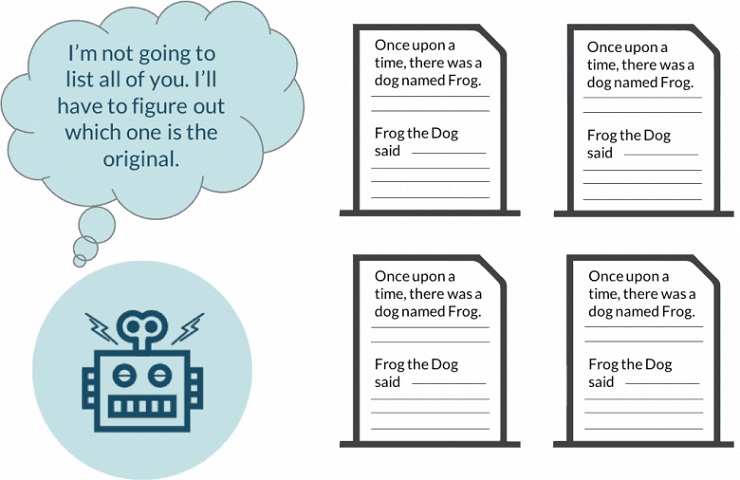
Duplicate content is a whole other game. You can have two different types of duplicate content.
- When you have two pages or blog posts where the majority of text is copied. This can be easily fixed by rewriting an article.
- When you have two pages on your webpage that are exactly alike.
For example, if you have two urls:
https://example.com/blog-post/
https://example.com/category/blog-post/
Google views these as two different pages, and if you don’t have the right measures in place, considers it duplicate content, so it won’t get the search visibility it otherwise would.
The same applies to an HTTPS version of the site and an HTTP version of a site.
Source: Moz
How do you fix duplicate content issues?
For the most common issues, a 301 redirect or a catch all 301 redirect will do the trick, allowing you to redirect all duplicate pages to the page you want to rank on Google. A catch all redirect helps you redirect multiple pages with a single redirect rule. Here’s a great guide on 301 redirects from Ahrefs.
By forcing HTTPS across your whole site (if you have an SSL certificate), the HTTP (non secure) version of your site will automatically redirect to the HTTPS version so you won’t have duplicate content issues with the HTTP version. The same thing applies to the www and non www version of your site.
For example if you go to http://www.foundr.com it will automatically redirect you to https://foundr.com.
Add canonical tags
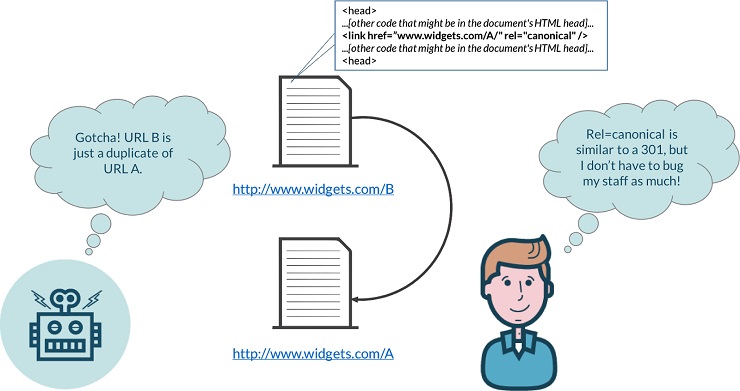
Another way to fix duplicate issues is to use canonical tags. If you have two pages that are exactly the same, you can tell Google which one you want to index using a canonical tag. Having a canonical tag basically tells Google not to index that page and instead it points to the original source.
Source: Moz
Canonical tags are a great way to fix duplicate issues without having to resort to redirects. Here’s a great guide on canonical tags from Yoast.
Pro tip: If you import a post to Medium, a canonical tag will be automatically added back to your website, so it’s not duplicate content to repost your entire article on Medium.
EXCLUSIVE FREE TRAINING: Successful Founders Teach You How to Start and Grow an Online Business
Technical SEO Doesn’t Have to Be Scary!
This is just the tip of the iceberg when it comes to technical SEO, but I tried not to complicate things too much, and hope this can serve as a beginners guide.
Don’t get overwhelmed with the to-dos in this article. Just start with one or two. Keep this article bookmarked and come back later to do a bit more.
However, if you have any questions, be sure to ask them in the comments below and I’ll be sure to answer them to the best of my ability.
Here are a few more resources that I would recommend if you want to dive further into technical SEO:
